
Pruning
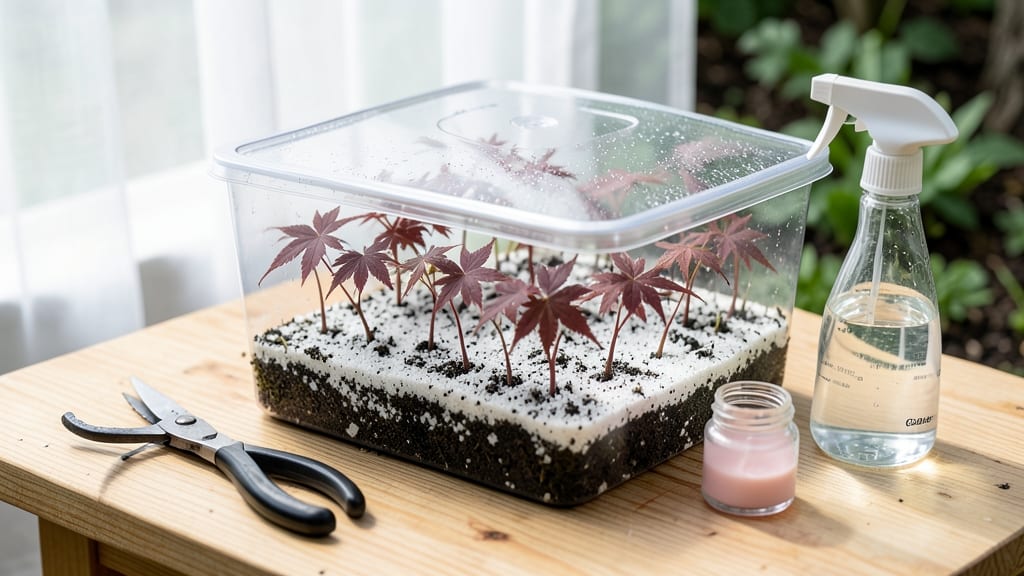
Japanese maple cuttings thrive when you master the layered soil moisture trick. 🌿 The secret isn't complicated—it's about keeping roots consistently damp without drowning them, a balance that transforms floppy stems into sturdy new trees within months.
I've rooted dozens this way, and the difference between success and failure often comes down to how you manage that moisture layer.
Timing matters most: take 4-6 inch semi-hardwood cuttings in late spring or early summer when new growth has hardened but isn't fully woody.
Dip the cut end in rooting hormone (optional but helpful), then plant at a 45-degree angle in a mix of 50% perlite and 50% peat moss—this combo drains fast but holds enough moisture to encourage roots.
Keep the pot wrapped in plastic to maintain humidity, but never let it sit in water.
What you'll end up with is a cutting that develops white, fuzzy roots in 6-8 weeks—visible through the clear plastic if you use a propagation chamber. The leaves stay vibrant, not wilted, and you'll know it's working when new growth appears at the top.
This method works even for finicky varieties like 'Bloodgood' or 'Emperor I', though they may take a little longer.
Once roots form, harden off the cuttings by gradually exposing them to outdoor conditions over 2 weeks, then plant them in well-draining soil. The first winter is critical—mulch heavily to protect tender roots, and you'll have a 3-4 foot tree in just a few seasons.
The payoff? A Japanese maple grown from your own cuttings develops a stronger root system than nursery plants, meaning fewer transplant shocks and better color in years to come.
📚 In This Guide
- What you need
- Instructions
- Tips and common mistakes
- Wrapping up and next steps
What you need
- ● Healthy Japanese maple cuttings: 4–6 semi-hardwood cuttings (6–12 inches long)
- ● 1/4-inch diameter, taken from new growth (current season’s wood)
- ● Rooting hormone: 1 small bottle (powder or gel, like Rootone or Clonex)
- ● Well-draining potting mix: 1 bag (50% perlite or vermiculite, 50% peat moss or coco coir)
- ● Small pots or trays: 4–6 (4-inch diameter) with drainage holes
- ● Spray bottle: 1 (for misting)
- ● Pruning shears or sharp knife: 1 (sterilized with rubbing alcohol)
- ● Plastic wrap or humidity dome: 1 (to retain moisture)
- ○ Clear plastic bag or propagator: 1 (optional but recommended for humidity)
- ● Fungicide (like Mycorrhizal inoculant to prevent rot)
- ● Heat mat (70–75°F for faster rooting)
- ● Grow lights (if natural light is insufficient)
- ● pH test kit (ideal soil pH: 5.5–6.5 for Japanese maples)
- ● Label markers (to track cutting varieties)
Step-by-Step guide to propagating Japanese maple tree cuttings
Here’s how to coax roots from your Japanese maple cuttings using moisture layers—no fancy tools needed.
🌱 Step 1: Select and Prepare Healthy Cuttings
Choose 4-6 inch semi-hardwood cuttings from new growth that’s pencil-thick—they’re the easiest to root. Make a clean cut just below a leaf node with sharp pruners, then strip off all but the top 2-3 leaves. This reduces moisture loss while keeping the cutting energized.
Dip the cut end in rooting hormone (optional but helpful) to encourage root formation. I like to work on a cloudy day or in the early morning—less stress on the cutting. If you’re using a pencil to mark the cutting, do it now before the hormone dries.
💧 Step 2: Create a Moisture Layer for Root Development
Fill a 6-inch pot with a mix of 50% perlite and 50% peat moss—this combo holds moisture while allowing airflow. Wet the mix until it’s damp but not soggy, then poke a hole with your finger about 2 inches deep. Insert the cutting until it’s 1 inch below the soil line, leaving the top leaves exposed.
Gently press the soil around the cutting to remove air pockets, then water lightly until moisture seeps to the surface. Place a clear plastic bag loosely over the pot to trap humidity—this mimics the damp forest floor where Japanese maples thrive. Secure the bag with a rubber band, leaving space for airflow.
☀️ Step 3: Position for Indirect Light and Consistent Moisture
Set the pot in a spot with bright, indirect light—think east-facing window or under a sheer curtain. Direct sun will scorch the leaves, while too little light slows root growth. You’ll know it’s right when the leaves stay vibrant green but don’t wilt.
Check moisture daily by lifting the pot—if it feels light, mist the soil until damp. Overwatering here is the biggest mistake; soggy soil causes rot. After 4-6 weeks, gently tug the cutting. If you feel light resistance, roots are forming. If not, wait another week.
✂️ Step 4: Transplant When Roots Are Established
Once roots reach 1-2 inches long (usually 8-12 weeks), remove the plastic bag and harden off the cutting by placing it outside in partial shade for 2 hours daily, increasing time over a week. This toughens the cutting for its new home.
Plant in a well-draining mix of 50% garden soil and 50% compost, keeping the root ball level with the soil surface. Water deeply but avoid saturating the roots—Japanese maples hate wet feet. Mulch around the base to retain moisture and protect young roots from temperature swings.
Tips & tricks for perfect Japanese maple tree cuttings
These moisture-focused tricks will help your cuttings thrive without the guesswork—because Japanese maples deserve the right conditions to grow.
Timing Secret: In Step 1, work with fresh cuttings immediately after harvesting. The sooner you plant them—within 24 hours—after taking the cuttings, the better their survival rate. I've found that cuttings left sitting for more than a day lose vitality, making root formation much harder. If you can't plant right away, store them in a plastic bag with damp paper towels in the refrigerator for up to 24 hours.
Moisture Layer Technique: When creating your 50% perlite and 50% peat moss mix in Step 2, think "damp sponge" rather than wet. The mix should hold together when squeezed but not drip water. Too soggy, and you risk rot; too dry, and roots won't develop. I like to add a handful of worm castings to the mix for extra nutrients—this is completely optional but gives your cuttings a little boost.
Light Positioning: For Step 3's bright, indirect light, I've had the most success with a north-facing window or under fluorescent grow lights. If you only have south-facing windows, place a sheer curtain between the light and your cuttings. The goal is to keep those leaves vibrant green—any yellowing means too much sun, while dull leaves mean not enough light. A simple leaf thermometer can help you monitor temperature, which should stay between 65-75°F during daylight.
Root Development Check: That 4-6 week root check in Step 3 is where patience pays off. When you gently tug and feel resistance, that's your sign! If you're unsure, carefully remove one cutting to check roots—if they're white and fuzzy (like tiny hairs), they're healthy. If they're brown or mushy, you've got rot. This visual check helps you decide whether to wait another week or troubleshoot your moisture levels.
Pro Tips for Japanese Maple Tree Cuttings
- These moisture-focused tricks will help your cuttings thrive without the guesswork—because Japanese maples deserve th...
- Timing Secret: In Step 1, work with fresh cuttings immediately after harvesting. The sooner you plant them—within 24 ...
- Moisture Layer Technique: When creating your 50% perlite and 50% peat moss mix in Step 2, think "damp sponge" rather ...
Frequently asked questions
Got questions about propagating Japanese maple cuttings?
You’re not alone—this delicate process can feel tricky at first. Below, we’ve answered the most common queries to help you grow confident with your cuttings!
When is the best time to take Japanese maple cuttings?
The ideal window is late winter to early spring (just before new growth begins) or mid-summer (June–July). Avoid extreme heat or cold—these trees root best in mild, stable conditions. For semi-hardwood cuttings (the most reliable method), aim for after the first flush of leaves but before the tree’s energy shifts to fruit or seed production.
How do I know if my cutting will root successfully?
Look for these signs: healthy, flexible stems (not brittle or woody), 2–3 sets of leaves, and no signs of disease (like black spots or oozing sap). Avoid cuttings from the top of the tree—they’re often too tender. A good cutting should snap (not break) when bent slightly. Pro tip: Dip in rooting hormone and keep humidity high!
Why are my Japanese maple cuttings rotting?
Overwatering or poor drainage is the #1 culprit. Japanese maples hate soggy roots—use a well-draining mix (50% perlite/pumice, 50% peat or coco coir) and only water when the top inch feels dry. Yellowing leaves or mushy stems? Reduce water immediately and ensure pots have drainage holes. Airflow matters too—avoid crowded containers!
Can I propagate Japanese maple cuttings indoors?
Yes, but success depends on light and humidity. Place cuttings near a bright, indirect window (south-facing works best) and use a humidity dome or plastic bag to trap moisture. A grow light (12–14 hours/day) can help if natural light is weak. Just avoid drafts—consistent warmth (65–75°F) is key. Patience is critical; rooting may take 4–8 weeks!
What’s an alternative if my cuttings fail?
No stress! Try air layering (a more forgiving method) or buying a young tree from a reputable nursery. For air layering, wrap a section of the branch with damp sphagnum moss and plastic, then wait 2–3 months for roots to form before cutting. If you’re set on cuttings, start small—even 2–3 successful propagations make it worth the effort!
Wrapping up and next steps
Growing Japanese maple tree cuttings is a rewarding journey that blends patience with the magic of nature! 🌱 By mastering the layered soil moisture technique and understanding the right timing, light, and care, you’ll soon be nurturing thriving new trees. Don’t let hesitation hold you back—start small, experiment, and watch your green thumb flourish!
Ready to take the next step? Try propagating your first cutting this season and share your progress with fellow gardening enthusiasts!