
Pruning
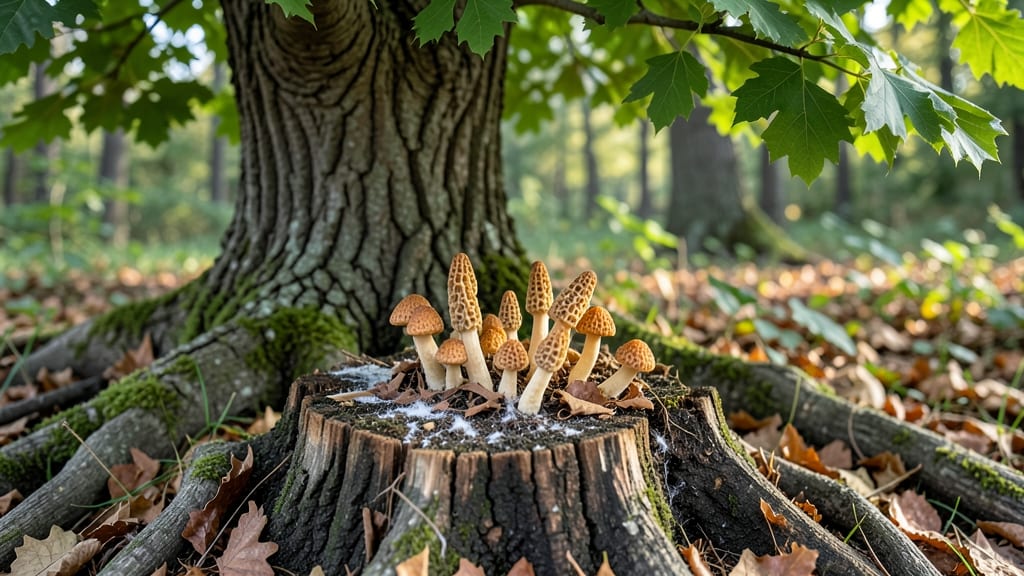
Morels near elm trees aren’t just a lucky find—they’re nature’s secret partnership. 🌱 The decaying wood of American elms creates the perfect conditions for these prized mushrooms to emerge after spring rains, thanks to hidden fungal networks beneath the soil.
These mushrooms thrive where elm roots decay, but not all morels are safe to eat. Always confirm identification before harvesting—some lookalikes can be toxic. I’ve spotted them in my own yard after pruning old branches, and they always appear in the same damp, shaded spots.
If you want to encourage morels, leave some decaying elm wood or stumps in your garden. But if you prefer a tidier landscape, remove infected wood promptly—morels won’t appear where there’s no decay to sustain them.
Timing is everything: harvest them young and firm, before they release spores. A sharp knife and a basket are all you need—no fancy tools required. Just watch for them after warm, rainy springs, when the forest floor comes alive with these golden treasures.
📚 In This Guide
- What you need
- Instructions
- Tips and common mistakes
- Wrapping up and next steps
What you need
- ● Foraging Knife or Pruners: A sharp, sturdy knife (3-4 inches) or small pruning shears to carefully extract morels without damaging the tree roots.
- ● Basket or Breathable Bag: A perforated basket or mesh bag (avoid plastic!) to prevent moisture buildup and keep mushrooms fresh. Minimum size: 12" x 12".
- ● Field Guide or App: A reliable morel identification guide (e.g., National Audubon Society Field Guide to Mushrooms) or a foraging app like iNaturalist or PictureThis.
- ○ Gloves (Optional but Recommended): Lightweight, breathable gloves to protect hands from dirt, sap, or potential irritants.
- ● Notebook & Pen: To log locations, dates, and conditions for future reference.
- ● Water Bottle: Staying hydrated is key—especially during long foraging sessions!
- ● Knowledge of Elm Trees: Familiarize yourself with Ulmus species (e.g., American Elm, Slippery Elm) and their habitats. Morels often appear near rotting wood or wounded roots.
- ● Weather & Timing: Morels thrive after spring rains (April–May in most regions). Check forecasts for warm days + cool nights—ideal spawning conditions!
- ● Safety First: Wear closed-toe shoes and long pants to avoid ticks or brambles.
- ● Bring a first-aid kit for minor scrapes or stings.
- ● Forage alone or with a buddy—never venture into unfamiliar areas solo.
- ● UV Light (Wood’s Lamp): Some morels fluoresce under UV light—useful for night foraging or tricky ID scenarios.
- ● Portable Scale: Weigh your haul to track yields (morels lose weight when dried!).
- ● Spray Bottle with Water: Lightly mist mushrooms to keep them fresh if you’re foraging for hours.
- ● Camera: Snap photos of your finds for future reference or to share with local foraging groups.
How to identify and harvest morels under elm trees
Here’s how I find and gather these prized wild mushrooms—without damaging the tree or missing the window.
🌿 Step 1: Locate the Right Elm Trees
Morels love elms, but not all elms produce them. Look for mature American elms (Ulmus americana) or slippery elms (Ulmus rubra) in moist, well-drained soil. I check areas with leaf litter or mulch—these spots hold moisture longer, which morels adore. Avoid trees near construction zones or treated with fungicides, as chemicals disrupt the mycorrhizal relationship morels need.
Timing matters too. Morels appear in spring, typically after 3-5 days of steady rain when soil temperatures hit 50-60°F. I start scouting in late March or early April, depending on my region. Watch for other foragers—the best spots get crowded fast.
🔍 Step 2: Search for the Classic Honeycomb Shape
Morels have a distinctive honeycomb cap with deep pits that look like a sponge. They’re white to tan when young and turn yellowish-brown as they age. I avoid anything with red or orange tones, as those often signal toxic look-alikes like the false morel (Gyromitra).
Look under the tree’s canopy, especially near the trunk’s drip line where water collects. I part the leaf litter gently with a stick—never dig or disturb the soil deeply. Morels grow just below the surface, often clustered in groups of 3-10 mushrooms. If you see one, check the 6-inch radius around it.
✂️ Step 3: Harvest Carefully for Future Growth
Twist the morel gently at the base to avoid tearing the mycelium. If it won’t budge, leave it—you’ll find more next season. I cut the stem ½ inch above the soil line with clean shears to prevent dirt from contaminating the cap. Never pull them by the cap, or you’ll ruin the mushroom.
Harvest only fully mature but still firm morels. Overripe ones get soft and bruise easily, and their flavor turns bitter. I fill a paper bag (not plastic—it traps moisture and spoils them fast) and store them in the fridge for 3-5 days or freeze them whole for later cooking.
🌱 Step 4: Preserve the Tree’s Health for Next Year
Morels thrive where the tree’s roots and fungi form a symbiotic bond. After harvesting, I scatter a thin layer of wood chips or leaf mulch around the base to retain moisture and protect the mycelium. Avoid heavy foot traffic or compacting the soil—morels need loose, airy conditions to regrow.
If the tree shows signs of stress (yellowing leaves, dead branches), skip harvesting that year. A healthy elm produces morels for decades. I mark good spots with a small flag or GPS note so I can return annually. Patience pays off—some elms yield hundreds of morels in a single season once the mycelium network is established.
Tips & tricks for perfect wild morel harvests
Here's what nobody tells you about finding and harvesting morels that'll keep you coming back year after year.
Tree Selection Tip: Focus on American elms with thick, healthy canopies—they're the most reliable producers. I've found the best clusters under trees with mature bark (at least 10 years old) and slightly cracked trunks, which provide microclimates perfect for morel growth. Avoid young trees or those showing signs of Dutch elm disease, as their mycorrhizal networks are often compromised.
Timing Secret: The 50-60°F soil temperature window is critical—use a soil thermometer if you're unsure. I've learned to scout after three consecutive rainy days when the sun comes out, as this creates the perfect moisture-to-warmth ratio. Early morning is best for hunting, as dew keeps the ground damp longer and makes morels easier to spot among the leaf litter.
Harvesting Technique: When you find a cluster, examine the 6-inch radius carefully—morels often grow in concentric circles. I use a small hand trowel to gently loosen the soil around the base before twisting, which prevents damaging the mycelium. Remember, you're not just harvesting mushrooms; you're preserving the tree's future harvests.
Storage Wisdom: Never wash morels before storing—they absorb moisture like sponges and spoil quickly. Instead, brush off debris with a soft brush or damp paper towel. For long-term storage, freeze them whole in paper bags (never plastic) and thaw only when ready to use. I've kept morels this way for up to 6 months without losing quality, perfect for late-summer cooking when fresh morels are scarce.
Pro Tips for Elm Tree Morel Mushrooms
- Here's what nobody tells you about finding and harvesting morels that'll keep you coming back year after year.
- Tree Selection Tip: Focus on American elms with thick, healthy canopies—they're the most reliable producers. I've fou...
- Timing Secret: The 50-60°F soil temperature window is critical—use a soil thermometer if you're unsure. I've learned ...
Frequently asked questions
about foraging elm tree morel mushrooms—your top queries answered!Where exactly do morels grow near elm trees?
Morels often appear in clusters near dead or dying elm trees, especially after spring rains (April–May). Look for them in moist, well-drained soil under the tree’s canopy or in nearby leaf litter. Avoid live trees—they’re less likely to host morels. Pro tip: Check areas with elm bark beetle damage (small holes in bark) for higher success!
How long does it take for morels to grow after rain?
Morels typically emerge 24–72 hours after heavy rain when soil temps are 50–65°F (10–18°C). They grow quickly—harvest within 3–5 days or they’ll turn bitter. Watch for: Honeycomb caps (never bruised) and a spongy, not fibrous, stem. Timing is everything!
Can I eat morels from elm trees without cooking them?
Never eat raw morels!
They contain hydrazines, which can cause nausea or worse. Always sauté, grill, or bake them first (10+ mins at high heat). Elm-associated morels (Morchella esculenta) are safe when cooked, but double-check ID—some lookalikes (like false morels) are toxic.
What’s the best way to ID elm morels vs. lookalikes?
Use this quick checklist:
- Shape: Honeycomb or pitted cap (never smooth or wavy).
- Stem: Hollow, spongy, and attached to the cap.
- Red flags: White veins on cap, powdery spores, or a fibrous stem.
When unsure, cut a cross-section—true morels have a hollow stem and no gills. Need a visual?
Are there alternatives if elm trees don’t produce morels?
Try these morel-friendly trees instead:
- Apple, ash, or tulip trees (common hosts).
- Burned or disturbed areas (morels love decaying wood).
- Morel cultivation kits (if foraging isn’t an option).
Bonus: Some foragers swear by elm leaf tea (steep dried leaves) to attract morels—though science isn’t conclusive!
Wrapping up and next steps
Discovering elm tree morel mushrooms is a rewarding adventure that connects you with nature’s hidden treasures! 🌳✨ Whether you’re a seasoned forager or just starting, remember to prioritize safety, patience, and respect for the ecosystem.
Armed with the right knowledge—like identifying the perfect elm habitat, timing your harvest, and avoiding lookalikes—you’re well on your way to a successful wild harvest.
Now that you’re equipped with the secrets, grab your basket and head outdoors! Start small, document your finds, and share your passion with fellow nature lovers. Happy foraging—and may your next walk yield a bountiful, delicious surprise! 🍄🌿