
Pruning
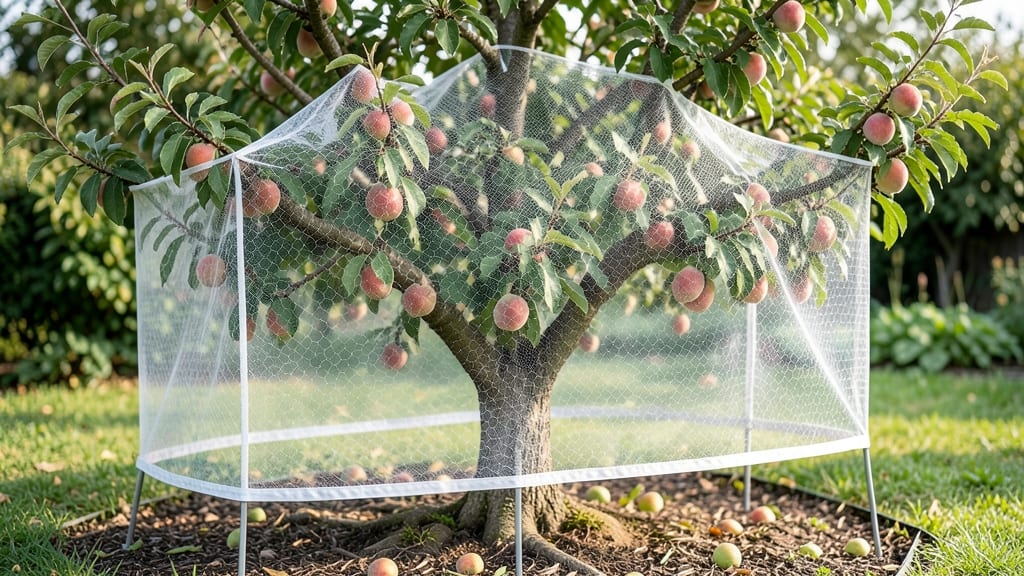
My fruit tree net catchers saved last year’s peaches from a squirrel invasion—no more half-eaten harvests or dropped fruit. 🌱 The right netting keeps birds, insects, and critters out while letting your tree breathe, and the best part?
You’ll see cleaner, healthier fruit that stays on the branch longer. Installation takes less than 30 minutes, and once up, it’s hands-off protection all season.
Not all nets are created equal: fine mesh works for insects, while larger holes deter birds without blocking sunlight. I prefer lightweight, UV-stabilized netting that lasts years—no more fraying or sagging mid-season.
For heavy fruit like apples, add a sturdy frame to keep the net taut, or use zip ties and stakes for smaller trees. The goal is snug but not suffocating; your tree should still grow like normal.
You’ll notice the difference immediately: fewer bruised fruits, no pest damage, and a harvest that stays fresh on the tree until you’re ready to pick. Plus, the netting doubles as a windbreak for delicate branches.
Just watch for tangling during storms—securing the edges with bungee cords solves 90% of that problem. With the right setup, your yield could increase by 30-50% in just one season.
Works for any fruit tree—apples, peaches, cherries, or even berry bushes—and adapts to container gardens too. The key is timing: install nets before blooms open to block pests early, and remove them after harvest to let the tree rest. Now, let’s get that harvest protected!
📚 In This Guide
- What you need
- Instructions
- Tips and common mistakes
- Wrapping up and next steps
What you need
- ● Net catcher material: Heavy-duty fruit tree netting (polypropylene or polyethylene mesh, 1/2" to 1" hole size for small pests, 1" to 2" for birds). Quantities vary: Small trees (6–10 ft): 10–15 ft of netting
- ● Medium trees (10–15 ft): 20–30 ft
- ● Large trees (15+ ft): 40+ ft
- ● Support structures: Bamboo stakes, metal T-posts, or wooden dowels (4–6 stakes per tree, 3–5 ft long)
- ● Zip ties, clothespins, or soft plastic ties (10–20 per tree) for securing netting
- ● Measuring tape (for accurate netting cuts)
- ● Scissors or utility knife (for trimming netting)
- ● Work gloves (to protect hands from prickly branches or netting)
- ● Pre-made net catcher kits (save time—check local garden centers or online stores)
- ● Wire or cable ties (for extra-secure fastening)
- ● Reflective tape (to deter birds if visibility is an issue)
- ● Pole or ladder (for taller trees—safety first!)
How to install fruit tree net catchers for maximum protection
Here’s my go-to method for keeping pests and birds away without harming your trees.
🪴 Step 1: Choose the Right Net and Size for Your Tree
Select a fine-mesh fruit tree net (¼-inch or smaller holes) designed to block birds, squirrels, and insects while allowing sunlight and rain through. Measure your tree’s canopy spread—add 2 feet extra on all sides to ensure full coverage. For a 4-foot-wide tree, a 6-foot-wide net works perfectly. Avoid stretchy materials; opt for polyester or nylon that holds its shape.
I always check the net’s UV resistance rating—a 3-5 year rating means it won’t degrade quickly from sun exposure. If your tree is tall, consider overlap sections (sew or use clips) to prevent gaps where pests can sneak in. A 10-foot net covers most standard fruit trees, but dwarf varieties may only need 5 feet.
🌿 Step 2: Install Support Stakes and Frame for Stability
Drive 4-6 sturdy wooden or metal stakes into the ground around the tree’s perimeter, 1-2 feet outside the canopy edge. Space them 3-4 feet apart for even support. Use a measuring tape to ensure stakes are level—uneven stakes create weak spots where the net sags or tears. Attach a flexible wire frame (like garden twine or zip ties) between stakes to create a temporary scaffold before draping the net.
For larger trees, add horizontal support wires every 2 feet vertically to prevent the net from collapsing under wind or weight. I like to use galvanized wire because it won’t rust and holds tension well. If your tree is young, skip the frame and simply drape the net loosely—it’ll stretch as the tree grows.
💧 Step 3: Drape and Secure the Net Properly
Lay the net over the tree, ensuring it fully covers all branches where fruit develops. Pull it snug but not taut—too tight restricts airflow, and too loose lets pests creep underneath. Secure the edges to stakes with heavy-duty clips or bungee cords, adjusting for wind movement. For extra stability, weight down corners with bricks or sandbags if your area gets gusty.
Check for gaps larger than ½ inch—even small openings let birds and insects through. If you see light shining through, adjust the net immediately. I also fold over the top edges to prevent critters from digging underneath. For trees with low-hanging branches, tuck the net underneath and secure it to the trunk with soft ties to avoid scratching the bark.
✂️ Step 4: Maintain and Adjust Through the Season
Inspect the net every 2 weeks for tears, sagging, or pest activity. Repair holes with duct tape or mesh patches—avoid plastic tape, as it degrades in sunlight. If your tree grows taller, add extra stakes or extend the net to maintain full coverage. After harvest, remove and store the net in a dry place to prolong its life. I keep mine rolled up in a ventilated bin with silica gel packets to prevent mold.
Watch for sunburn spots on fruit where the net touches—if you see discoloration, loosen the net slightly or add lightweight padding (like burlap strips) between the net and branches. In late fall, trim any broken branches that could tear the net when you reinstall it next season. This keeps the setup easy and effective year after year.
⏰ Step 5: Time Installation for Best Protection
Install the net as soon as buds form in early spring—this stops birds from pecking at blossoms. If you’re late, cover the tree immediately after fruit sets (usually 4-6 weeks after flowering). For stone fruits like peaches, I add the net just before ripening to protect against wasps and starlings. Remove it 2-3 weeks before harvest to avoid trapping moisture and encouraging rot.
If you’re using the net for winter storage, clean it first by hosing off debris and letting it dry completely in the sun. Fold it away from the tree to prevent mold buildup. I mark the net with a permanent marker (e.g., "Apple Tree – South Side") so I know which tree it belongs to when reinstalling. This saves time and frustration come spring.
Tips & tricks for perfect fruit tree net installation
A few simple tricks will help you avoid common mistakes and keep your fruit tree nets working like a charm all season long.
Mesh Size Matters: That ¼-inch mesh specification in Step 1 isn't just arbitrary—it's the difference between keeping out birds and letting in wasps. I've seen squirrels slip through larger holes, so always verify the mesh size before purchasing. For extra protection against determined pests like starlings, consider a net with ⅛-inch holes if your budget allows. The trade-off is slightly less airflow, but the peace of mind is worth it.
Stake Placement Strategy: In Step 2, those 1-2 feet outside the canopy edge measurements are critical. I learned this the hard way when a gust of wind blew my net right back onto the tree! For trees with irregular canopies, add an extra stake on the windward side. If you're working with a very young tree, you can actually skip the frame entirely and just drape the net loosely—it'll stretch as the tree grows, saving you the hassle of reinstalling stakes every year.
Seasonal Timing is Everything: The instructions mention installing at bud formation, but here's what nobody tells you—timing varies by fruit type. For apple and pear trees, aim for early spring when buds first appear. For stone fruits like peaches and cherries, wait until after the last frost but before blossoms open. I mark my calendar with the average last frost date in my area and add two weeks as a buffer. This ensures I'm ready to install at the perfect moment when birds are most active.
Maintenance Shortcut: That every 2 weeks inspection in Step 4 can feel tedious, but here's my pro move: I set a phone reminder for every full moon night. The moonlight makes it easy to spot tears or pest activity in the net, and checking under the light of a full moon means I don't need a flashlight. Plus, the lunar cycle gives you a natural rhythm to track seasonal changes in your tree's growth.
Pro Tips for Fruit Tree Net Catcher
- A few simple tricks will help you avoid common mistakes and keep your fruit tree nets working like a charm all season...
- Mesh Size Matters: That ¼-inch mesh specification in Step 1 isn't just arbitrary—it's the difference between keeping ...
- Stake Placement Strategy: In Step 2, those 1-2 feet outside the canopy edge measurements are critical. I learned this...
Frequently asked questions
Got questions about fruit tree net catchers? You’re not alone! Here are some of the most common concerns—plus quick, practical answers to help you protect your harvest like a pro.
When is the best time to install a fruit tree net catcher?
Install your net before fruits appear—typically in early spring (just as buds swell) or late winter. This ensures pests and birds can’t access your tree when it’s most vulnerable. For late-blooming trees (like peaches), check local frost dates and adjust timing accordingly. Pro tip: Secure the net tightly to avoid gaps where critters can sneak in!
Will fruit tree nets keep out squirrels, raccoons, and other large pests?
Standard net catchers (with ½-inch to 1-inch mesh) deter birds and small insects but may not stop determined squirrels or raccoons. For larger pests, opt for heavier-duty netting (like 1-inch mesh with reinforced edges) or combine nets with tree wraps or physical barriers around the trunk. Bonus: Spraying peppermint oil around the base can also help!
How long should I leave the net on my fruit tree?
Keep the net in place throughout the entire growing season—from bud break until harvest (and even a few weeks after, if fruits ripen unevenly). Remove it only after all fruits are picked to avoid trapping moisture, which can promote rot. For persistent pests, consider leaving it on until fall leaf drop.
Are there cheaper alternatives to commercial fruit tree nets?
Yes! DIY options include:
- PVC pipe frames + lightweight bird netting (stapled securely).
- Burlap sacks or old bedsheets draped loosely (less effective but better than nothing).
- Repurposed window screens for small trees (ensure no tears!).
What should I do if my fruit is still getting eaten despite the net?
First, check for gaps, holes, or loose edges in the netting—animals exploit even small openings! If the issue persists:
- Inspect for chewing marks (squirrels vs. birds leave different signs).
- Add a second layer of netting or switch to a denser mesh.
- Set up non-lethal deterrents, like reflective tape or motion-activated sprinklers.
Wrapping up and next steps
Investing in a fruit tree net catcher is a simple yet powerful way to safeguard your hard work and enjoy a bountiful harvest year after year. 🌱 Whether you're dealing with pesky birds, hungry squirrels, or invasive insects, these nets act as a reliable shield—keeping your fruit intact and your garden thriving. Now’s the time to take action!
Ready to protect your trees? Start by measuring your fruit trees and choosing the right net size. Visit your local garden center or order online—your future harvest will thank you! 🌟