
Pruning
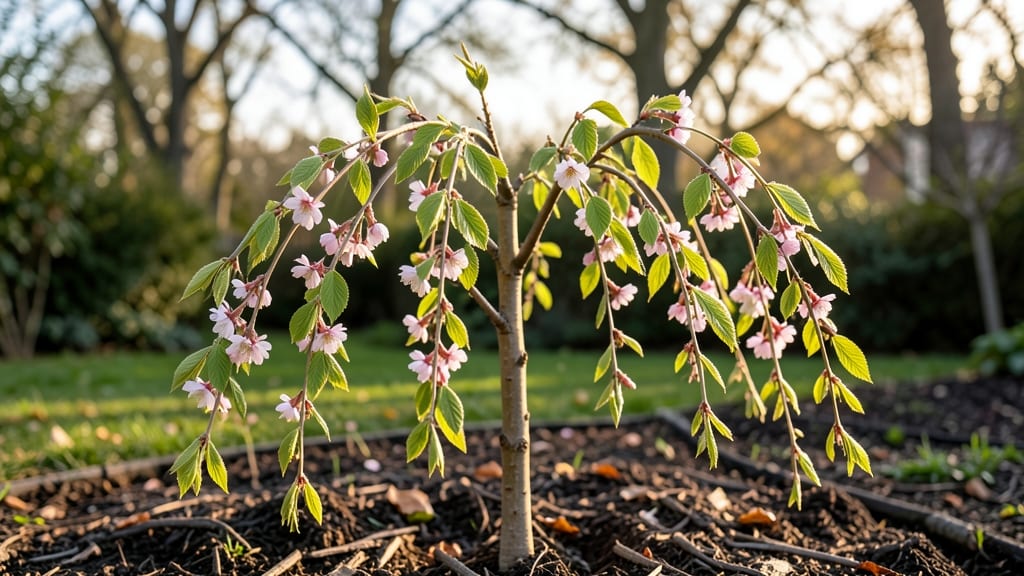
Your weeping cherry tree sapling needs strategic pruning from day one to create that iconic, cascading silhouette—something I learned the hard way after my first branches grew too stiff. 🌸 The secret isn’t just cutting back; it’s shaping the growth habit early, so the tree develops naturally graceful, weeping limbs rather than rigid upright branches.
Start with well-draining soil and full sun (at least 6 hours daily), then water deeply twice a week for the first year—overwatering is the fastest way to kill a sapling.
Prune in late winter or early spring before buds swell, removing one-third of the new growth each year to encourage branching. Use sharp pruners and make clean cuts just above a bud angled away from the branch.
By year three, you’ll see those signature arching branches taking shape, heavy with delicate pink blossoms in spring. The key is patience—rushing pruning leads to weak growth, while consistent shaping rewards you with a tree that looks like it’s been growing for decades.
Even black thumbs can master this with the right technique.
Works in USDA zones 5-8, though colder climates need winter protection for young trees. The first five years are critical—after that, maintenance pruning keeps it thriving for generations. Let’s get those branches weeping the right way!
📚 In This Guide
- What you need
- Instructions
- Tips and common mistakes
- Wrapping up and next steps
What you need
- ● Weeping cherry tree sapling: Healthy, 1–3 year-old sapling (check for strong roots and vibrant foliage).
- ● Pruning shears: Sharp, bypass-style shears (2–4 inch blade size) for clean cuts.
- ● Loppers: 1 pair (for thicker branches, if needed).
- ● Hand pruners: 1 pair (for precision trimming of smaller branches).
- ● Disinfectant (70% isopropyl alcohol or pruning sealant): 1 small bottle to sterilize tools between cuts.
- ● Garden gloves: 1 pair (cut-resistant for safety).
- ○ Pruning saw (optional): For branches thicker than 1 inch.
- ● Measuring tape: 1 (to track branch length and spacing).
- ● Notebook & pen: For sketching pruning plans or noting growth patterns.
- ● Tree ties or soft plant ties: 5–10 (to support new branches temporarily).
- ○ Mulch (optional): 2–3 inches of organic mulch (e.g., shredded bark) to retain moisture.
- ● Fertilizer (balanced 10-10-10 or slow-release): 1 small bag to nourish post-pruning.
- ● Choose a mild, dry day (avoid pruning in rain or extreme heat).
- ● Ensure your sapling is well-watered 24 hours before pruning.
- ● Review your weeping cherry tree’s growth habits (e.g., Prunus subhirtella ‘Pendula’ vs. Prunus serrulata ‘Kwanzan’).
- ● Pro tip: 💡 Wear long sleeves and pants—cherry trees can have thorns!
Strategic pruning guide for weeping cherry tree saplings
Transform that leggy sapling into a stunning, balanced weeping form with these proven techniques.
✂️ Step 1: Assess and Prepare for Pruning Season
Prune your weeping cherry sapling during late winter or early spring, just as buds begin to swell but before new growth starts. This timing ensures you're shaping the tree when it's dormant but ready to respond to your cuts. I always do a quick visual scan first—look for branches that grow straight up or cross others, as these will compete with your desired weeping shape.
Gather your tools: a pair of sharp bypass pruners (never dull tools—they tear wood) and rubbing alcohol for sterilizing cuts. Wipe your pruners between each cut to prevent spreading disease. The goal here is clean, precise cuts that heal properly. I also like to have a small spray bottle of fungicide ready in case any cuts look particularly large or exposed.
🌿 Step 2: Remove Structural Flaws and Competing Growth
Start by removing any dead, diseased, or crossing branches—these are your first priorities. Weeping cherries naturally grow downward, so any upward-growing branches will disrupt that elegant form. Look for branches that grow at sharp angles (less than 45 degrees) or rub against others; these will weaken the tree over time. Cut these back to the main trunk or a strong lateral branch using a clean, angled cut just above a bud or lateral branch.
If you see water sprouts (those fast-growing, vertical shoots), remove them entirely. These steal energy from your tree's graceful weeping structure. For larger branches over ½ inch thick, make your cut just outside the branch collar—the swollen area where the branch meets the trunk. This ensures proper healing. You'll know you're on the right track when the tree starts showing its natural horizontal branching pattern within a few weeks.
☀️ Step 3: Shape for Optimal Weeping Form
Now focus on encouraging the weeping habit by selectively pruning branches that grow too upright. Aim to create a balanced, layered look with branches cascading downward. Start at the top and work your way down, cutting back any branches that grow straight up by ⅓ to ⅕ of their length. This promotes bushier growth lower on the tree, which is key for that classic weeping silhouette.
Pay special attention to the outer edges of the tree—these should be the longest, creating that dramatic, flowing effect. Avoid heavy pruning on the bottom branches; let them grow longer to enhance the weeping appearance. After pruning, step back and visualize the tree's shape. You're looking for a gradual taper from top to bottom, with no sudden gaps or dense clusters. If it feels uneven, adjust a few more branches until it looks balanced.
💧 Step 4: Post-Pruning Care for Healthy Growth
After pruning, give your weeping cherry a deep watering to help it recover. The tree will focus its energy on healing cuts and producing new growth, so consistent moisture is critical. Water at the base of the tree, avoiding the foliage to prevent fungal issues. Over the next few weeks, monitor the pruned areas for signs of stress—yellowing leaves or oozing sap can indicate too aggressive cuts.
Apply a balanced, slow-release fertilizer around the root zone to support new growth. I like to use a 10-10-10 formula in early spring, following the package instructions. Avoid heavy fertilizing right after pruning, as this can stress the tree. Instead, let it focus on establishing new branches. In the weeks following pruning, you should see new buds forming along the remaining branches—this is your sign that the tree is responding well to your shaping.
⏰ Step 5: Maintain Year-Round with Light Touch-Ups
Weeping cherries benefit from light pruning throughout the growing season to maintain their shape. In early summer, remove any suckers (shoots growing from the base) and overly vigorous branches that disrupt the weeping form. Use your fingers or small pruners for these quick adjustments—no need for heavy cuts. This keeps the tree looking tidy and encourages a denser, more uniform canopy.
In late summer, do a final check for any dead or crossing branches that may have developed. Prune these out before winter to prevent disease entry points. Avoid heavy pruning in fall or winter, as this can stimulate new growth that won't harden off before cold weather. Instead, focus on cleaning up and preparing the tree for dormancy. With consistent care, your weeping cherry will develop that iconic, graceful silhouette year after year.
Tips & tricks for perfect weeping cherry tree pruning
Here's what nobody tells you about transforming a leggy sapling into a stunning weeping cherry.
Timing Secret: The late winter to early spring window is crucial because it's when your tree is dormant but about to wake up. I learned this the hard way—pruning too early in winter can leave cuts vulnerable to frost damage, while waiting too late risks encouraging new growth that won't harden off properly. Look for those first swollen buds as your cue to start. If you miss this window, wait until summer when you can do light maintenance pruning instead.
Cutting Technique: Always make your cuts just outside the branch collar using sharp bypass pruners. I can't stress this enough—dull tools crush wood fibers, making healing much slower. For branches thicker than ½ inch, make the cut at a 45-degree angle to help water run off and prevent rot. The branch collar is that swollen area where the branch meets the trunk—never cut into it. This might seem like a small detail, but proper cuts mean the difference between a tree that heals beautifully and one that develops weak spots.
Visual Balance Tip: When shaping your weeping cherry, step back frequently to check the overall silhouette. The goal is a gradual taper from top to bottom with no sudden gaps. I like to imagine the tree as a graceful waterfall—each layer should flow naturally into the next. Start with the top branches and work your way down, cutting back any upright growth by ⅓ to ⅕ of their length. This creates that classic weeping effect while maintaining structural integrity. The outer edges should be the longest branches to create that dramatic cascading look.
Post-Pruning Recovery: After your main pruning session, give your tree a deep watering right at the base to help it recover. The first few weeks are critical for healing, so monitor for any signs of stress like yellowing leaves or excessive sap flow. I've found that applying a thin layer of fungicide to larger cuts helps prevent infection. Remember, the tree's energy is now focused on healing and producing new buds—this is your sign that everything is working as it should. Avoid heavy fertilizing right after pruning, as this can stress the tree when it's already working hard to recover.
Pro Tips for Weeping Cherry Tree Sapling
- Here's what nobody tells you about transforming a leggy sapling into a stunning weeping cherry.
- Timing Secret: The late winter to early spring window is crucial because it's when your tree is dormant but about to ...
- Cutting Technique: Always make your cuts just outside the branch collar using sharp bypass pruners. I can't stress th...
Frequently asked questions
Got questions about nurturing your weeping cherry tree sapling? You’re not alone! Here are answers to the most common queries—from pruning timing to troubleshooting—so you can keep your tree thriving year-round.
When is the best time to prune a weeping cherry sapling?
Prune your weeping cherry sapling in late winter or early spring (before buds swell) to encourage healthy growth. Avoid heavy pruning in fall—it can stress the tree and leave it vulnerable to disease. Light shaping in summer (after flowering) is fine, but never prune when the tree is dormant in winter.
How much should I trim off a young weeping cherry sapling?
For saplings (under 5 years old), remove no more than 20-25% of the foliage per year. Focus on:
- Dead or crossing branches
- Suckers at the base
- Overly long stems to maintain the weeping shape
Why are the leaves on my weeping cherry sapling turning yellow?
Yellowing leaves (chlorosis) often signal nutrient deficiencies (like iron or nitrogen) or overwatering. Check:
- Soil pH (weeping cherries prefer slightly acidic, 6.0–6.5)
- Drainage—soggy roots = trouble
- Fertilizer—use a balanced, slow-release formula in early spring
Can I grow a weeping cherry tree from a sapling in a pot?
Yes! Start with a 5-gallon container and well-draining soil (mix potting soil with perlite). Repot every 2–3 years and move outdoors in spring/summer. For best results:
- Choose a dwarf cultivar (e.g., ‘Kanzan’ or ‘Stella Pink’) if space is limited.
- Prune roots if they circle the pot (trim outer edges to encourage growth).
- Gradually acclimate to outdoor conditions to avoid shock.
What’s a good alternative if my weeping cherry sapling isn’t thriving?
If your sapling struggles with pests, disease, or slow growth, consider these low-maintenance alternatives with similar elegance:
- Japanese Maple (‘Bloodgood’) – Disease-resistant, vibrant foliage.
- Crape Myrtle (‘Natchez’) – Drought-tolerant, fragrant blooms.
- Dwarf Fountain Grass – Adds texture without heavy pruning.
Wrapping up and next steps
Growing a weeping cherry tree sapling into a stunning, year-round centerpiece is all about patience, precision, and a little love! With the right tools, timing, and pruning techniques—like shaping in early spring and maintaining airflow—you’ll nurture a tree that’s both functional and breathtaking. 🌸
Ready to take the next step? Start by scheduling your first light pruning session in the next mild-weather window (even if it’s just trimming a few branches!).
Observe your sapling’s growth, adjust as needed, and watch your hard work bloom into a masterpiece. Happy pruning—your future tree is counting on you! ✂️🌿